How to Photograph a Painting is a crucial skill for artists, collectors, and anyone looking to archive or showcase their artwork digitally. Whether you’re preparing images for a portfolio, online sales, or simply documenting your creations, capturing the essence of a painting through photography requires attention to detail. Unlike general photography, this process involves specific techniques to ensure that colors, textures, and details are represented accurately. This guide will walk you through each step, from preparation to lighting, helping you achieve professional-quality images that truly reflect your artwork’s value.
How to Photograph a Painting: A Step-by-Step Guide

Photographing a painting might seem straightforward, but achieving a perfect shot involves more than just pointing a camera. This step-by-step guide will help you navigate the nuances of this process, ensuring that every photograph you take showcases the best qualities of your artwork. In the sections that follow, we’ll cover essential preparations, lighting choices, and camera settings to help you master how to photograph a painting effectively.
Preparing Your Painting for Photography
Before you begin shooting, it’s crucial to prepare your painting. Proper preparation ensures that the artwork appears clean, vibrant, and free from any distractions that might detract from its presentation in the photograph.
Removing Glass and Frames
If your painting is framed or covered with glass, it’s best to remove these before photographing. Glass can cause unwanted reflections and glare, which can distort the colors and details of the painting. By removing the glass, you eliminate these issues, allowing the true quality of the artwork to shine through in the photograph.
Cleaning and Positioning the Painting
Dust and smudges can significantly affect the final image, so ensure your painting is clean. Use a soft, dry cloth to gently wipe the surface. Once cleaned, position the painting in a well-lit area, ideally against a neutral-colored wall. This neutral background helps in accurately capturing the colors of the painting without any interference from surrounding hues.
Choosing the Right Lighting
Lighting is arguably the most critical element in how to photograph a painting. The right lighting can make the difference between a flat, lifeless image and one that truly captures the depth and vibrancy of your artwork.
Natural Light vs. Artificial Light
Natural light is often preferred for its soft, even illumination, which is ideal for capturing the true colors of a painting. Position the artwork near a large window with diffused light for best results. However, artificial lighting offers more control and consistency. When using artificial lights, aim for daylight-balanced bulbs to mimic the natural light spectrum.
Setting Up Lighting Angles to Avoid Glare
Properly angling your lights is essential to avoid glare, which can obscure details and alter the appearance of colors. Position your lights at a 45-degree angle to the painting from either side. This setup helps distribute light evenly across the surface while minimizing the risk of glare.
Using Diffusers for Balanced Light
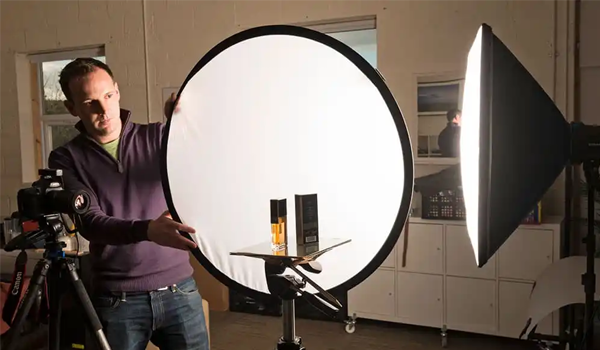
To achieve the softest and most balanced light, consider using diffusers. These can be as simple as placing a white sheet over your light source or investing in professional diffusing equipment. Diffusers help to soften the light, reducing harsh shadows and further preventing glare, ensuring that the photograph accurately reflects the painting’s details and colors.


